Top 5 ways to use trial software forever
 Top 5 ways to use trial software forever is a useful tips to make trial version software to full version software. Trial version software mostly comes with one month or a few days trial period and will expire after that. But you can stop that expiration of the trial version software and use that trial version software forever.You can tell trial version of the software to not count days or time then the trial version software keep working like original software forever and will not expire or cease to work
In this awesome cool tips, which will help you to use trial version software forever
Contents
- 1.How does these Trial Version Software Work?
- 2.Use trial version software by using Run As Date.
- 3.Use trial version software by using Time Stopper.
- 4.Use trial version software by reset date and time.
- 5.Use trial version software by backup registry and restore it.
- 6.Use trial version software by using a third-party uninstaller.
- 7.Summary.
1. How does these Trial Version Software Work?
When we install trial version software in our computer system; then it make an entry of details like installation date, time etc. in our systems registry. So when we run this trial version software then it compare the current date and time with the date and time in the registry. So thus after trial period, the trial version software block the user from accessing the particular trial version software.2. Use trial version software by using Ran As Date
Run As Date is a portable utility software that allows you to run a program or software in the date and time that you specify. The advantage of Run As Date is that it doesn't change the system date and time but it will only inject the date and time into the desired application.**Steps to use run as date:
1. User left click on "Browse... (push button)" in "RunAsDate". Browse your installed trial version software in --> windows drive >> Program Files >> then find out your installed trial version software and choose that .exe file which will run your program.
2. Now choose a date and time. This new date should include within trial period of the trial version software. We recommend to select tomorrow as the date.
3. Now you will able to create a desktop shortcut for future use. To create a desktop shortcut type the shortcut name and click on create desktop shortcut or click on Run push button to open the trial version software.
Download RunAsDate:
***Download RunAsDate
***Download RunAsDate for x64
3. Use trial version software by using Time Stopper.
Time Stopper will stop the trial time when it is used. If the trial period has already ended, it is of no use to use Time Stopper as it will not be able to reverse the time.Using Time Stopper is quite easy just follow these easy steps to use trial version software forever.
1. User left click on "Browse... (push button)" in "Time Stopper". Browse your installed trial version software in --> windows drive >> Program Files >> then find out your installed trial version software and choose that .exe file which will run your program.
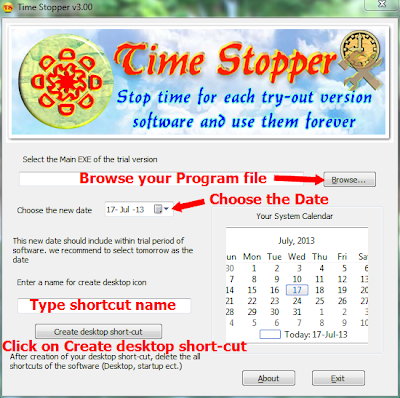
2. Now choose a date.This new date should include within trial period of the trial version software. We recommend to select tomorrow as the date.
3. Now you will able to create a desktop shortcut for future use. To create a desktop shortcut type the shortcut name and click on create desktop shortcut and use these shortcut to open the trial version software.
Note: After patching the trial version software by using Time Stopper, you must always use the desktop shortcut which created by Time Stopper to open that software otherwise the trial will end instantly.
Download Time Stopper 4.02:
***Download Time Stopper
You may like: Time Stopper - Download and Using Process
4. Use trial version software by reset date and time
To use trial version software forever, Change the date to future time before the installation of trial version software.After installation, you will reset the date. Then use trial version software forever.
Note: Some program will not support changing date and time manually in this case you will use Time Stopper or RunAsDate.
5. Use trial software by backup registry
If you haven't installed the software yet and you're sure that the software uses the Windows Registry to save its licensing information, you can backup the registry and then restore it when the software is about to expire.May you like: Back up windows registry and restore it without any software
6. Use trial software by using a uninstaller
You can uninstall the trial software using the third-party uninstaller; which will delete all the registry entries and files created by the trial software. You may try out some free apps like Revo Uninstaller, Glary Utilities, Geek Uninstaller, Total Uninstall, Your Uninstaller or Absolute Uninstaller Download Absolute Uninstaller and install it then uninstall the trial version software by using third-party uninstaller then re-install the trial version software and enjoy it.7. Summary
Now use trial version software without purchasing it or use longer duration before actually purchasing it. So enjoy trial version software forever without expiration.Feedback:
If you have any suggestion or doubts or problem, Just comment in below.
Try it yourself to enjoy trial version software.
Back up windows registry and restore it without any software

Contents
What is Windows registry?
The registry is a vast database in the windows system, containing all sorts of program data, system settings etc. Registry store information of your installed programs or software. It also control your windows system. Sometimes you need to edit your windows registry to control windows system.
Back up Windows registry, why need?
It is important for most user to make back up copies of their windows registry because sometimes you have to face an error or problem. In this situations, the back up windows registry file is being used by user to solve these problems. The main why we need to make backup copies of windows registry is given in below :< br />
- To restore windows registry
- To edit windows registry
- To solve most of the errors
- To remove unexpected problems and so on
- To restore windows system at earlier time
Back up Windows registry
Make a backup copy of windows registry when you wish to download or install a program and before edit windows registry. If you have to face an error or problem then you can solve these error or problem by restore windows registry. To make backup copies of windows registry, just follow some easy steps.
Steps to make backup copies of windows registry :
- 1. Click "Start button" then click on the "Run".
OR
PressWin +R at a time - 2. Now type "regedit" and press "Enter" key to open Windows registry editor.
- 3. On the "File" menu, click on the Export...
- 4. Choose your directory where you want to save the (back up registry) *.reg file then select "File name" text box and type the file name.
- 5. Select the "Save as type" according to condition you want to export.
- 6. Choose the "Export range" according to condition you want to export all or selected branches only.
- 7. Click on the "Save" button to save back up windows registry file

Restore Windows registry
To restore windows registry that you exported, just double click on the back up windows registry (*.reg) file that restore your windows registry.
OR
Open windows registry editor and on the file menu, click on the import then select your exported (back up windows registry) *.reg file that restore your windows registry.
Summary
"Back up windows registry and restore it without any software" is very important for most common user is to solve some errors or problems. So it's great opportunity to use Windows registry editor. We may use windows registry editor to control our windows system. We may also use it to use trial version software forever. Don’t go in a hurry, if you enjoyed this article, kindly subscribe to feeds and drop a comment to show some love.
Computer's system restore to an earlier time in windows 7 or 8

1. What is System Restore?
System restore is a way to recover or restore your computer's system without affecting your personal files, such as documents.It's help you restore your computer's system to an earlier time.2. Turn system restore on or off
System restore is turned on by default on the disk that contains windows files by system protection. You can turn system restore on or off by using system protection respectively on or off.2.1: Turn on system restore for specific disk:
1. Right click on "Computer" then left click on "Properties (menu item)".2. In the left pane ,click on "System protection (link)". If you are prompted for confirmation then click 'yes'.


4. Choose one of the following that you want:
* Restore system setting and previous versions of files.
* Only restore previous versions of files.

5. Click OK, and then click OK.
2.2: Turn of system restore for specific disk:
1. Right click on "Computer" then left click on "Properties (menu item)".2. In the left pane ,click on "System protection (link)".If you are prompted for confirmation then click 'yes'.
3. Under Protection Settings, select the disk and click Configure.
4. Choose Turn off system protection and click OK then click OK

3. What types of files does system restore change?
The following types of files are changed during a system restore:1. Windows system files.
2. Registry setting.
3. programs installed on your computer.
4. Script.
5. Batch files.
6. Executable files.
4. Start system restore from a command prompt
If you can't start your computer in normal mode then start your computer in safe mode with command prompt.1. Log on to your computer.
2. At the command prompt, type rstrui.exe then press Enter.
Note:
*If you start your computer in safe mode and use system restore then you can't undo the restore operation. But you can system restore again by choose a different restore point, if one exists.
5. Restore computer's system in windows 7 or 8
Just Follow these easy steps to restore your computer's system to an earlier time in windows 7 or 8 :1. *Left click on "Start menu" and type System Restore then click on 'System Restore'


-----------OR-----------
*To open with command prompt press
2. Click on'Next' and choose your restore point and then click 'Next'.

3. Click on 'Finish'.

4. You will see 'Once started, System Restore cannot be interrupted. Do you want to continue?' then click on'Yes' and wait.....

Your computer will restart and you will see a confirmation then the system restore process has completed.
6. If system restore doesn't fix the problem, then?
If System Restore doesn't fix your problem then you can Undo the System Restore and try choosing a different restore point. If System restore doesn't display other restore points to choose, then you can try an advanced recovery method. For more help, comment in below or contact with us.7. Undo system restore.
1. *Left click on "Start menu" and type System Restore then click on 'System Restore'.-----------OR-----------
*To open with command prompt press
2. Click on'Next' and choose Undo System Restore and then click 'Next'.
3. Click on 'Finish'.
4. You will see 'Once started, System Restore cannot be interrupted. Do you want to continue?' then click on'Yes' and wait.....Your computer will restart and you will see a confirmation then the system restore process has completed.
8. Summary
System restore is a very important methode to solve our problems. But system restore doesn't support FAT32 and other FAT disks because FAT disk don't support the use of shadow copies. So system restore possible only when the disks is NTFS. If you want to convert FAT32 to NTFS and if you don't know how to convert FAT32 to NTFS? For more help, Comment in below or Contact with us.Try it yourself to enjoy.
Thats all.
If you have any doubts or problem, Just comment in below.
How To use Your Computer Without any Mouse

Hey guys !!
Hope you all are fine. Today we gonna see How to use any computer without any Mouse. In this awesome cool Windows Keyboard Shortcut tips, which will help you to use any computer without any Mouse. Just Follow these easy steps to use your computer without any Mouse.
When your mouse is spoil, not available or maybe you want to simply impress your friends, you can use your keyboard as a mouse.
To do this just follow these easy process: Step-1: press
Then you can use your keyboard as a mouse.
Navigation keys for keyboard are :
For double click, just press the plus symbol
That's all.
If you have any doubts or problem, Just comment below. Don't forget to say- "Thank You".
Create your own screensaver easily.
I bless you all were friends, looking for a software. Which you choose according to your screen saver makes your desktop with animated
who can different levels. Animated Screen saver Maker software name is only 10.8 MB. Win rar to extract from the first download and install this. To obtain a serial key when it extracts the registration. How do you take it once was. Double-click the desktop icon to install the software is open, then you will like the image below -------

1. Here you can select the project.
2. Here you can select the image you want to keep the Screen saver
3. You want to select a type of animation
4. Create Screen saver click you can install a screen saver image as your nomination.
5. Here you can animation a different manner.Friends that like to see it.
What are you taking from the community. Do not forget to tell me.
Ultimate solution of Hang (PC)
 আসসালামু আলাইকুম
আশা করি সবাই ভাল আছেন !! আজ আমি আপনাদের কম্পিউটার হ্যাং হউয়া থেকে রক্ষা পাওয়ার উপায় সম্পর্কে লিখলাম, আশা করি কাজে লাগবে ।
প্রথমে Start থেকে Run এ গিয়ে regedit লিখে ইন্টার চাপুন।
Hkey_Current_User এ ডাবল ক্লিক করুন।
Control Panel এ ডাবল ক্লিক করুন।
Desktop এ ডাবল ক্লিক করুন। এখন ডানপাশের auto end task এ ডাবল ক্লিক করুন। এখানে Value Data হিসেবে 0 এর পরিবর্তে 1 লিখে OK ক্লিক করে বের হয়ে আসুন। এখন থেকে আপনার কম্পিউটারের হ্যাং সমস্যা কমে যাবে ।
আজ এই পর্যন্তই সবাই ভাল থাকুন, আগামী দিনের প্রত্যাশাতে- পিসি সলুশানের সাথেই থাকুন। আল্লাহ হাফেজ !!!
ভাইরাসের প্রবেশ বন্ধ করতে Autorun 100% (Windows 7) বন্ধ করুন
। অটোরান বন্ধ করার নিয়ম নিম্নে দেয়া হলো, আশা করি উপক্রিত হবেন >>>>
Start থেকে Run এ গিয়ে টাইপ করুন gpedit.msc এবং ইন্টার চাপুন । অতঃপর Administrative Templates থেকে Windows Component > AutoPlay Policies > Turn Off Auto play > Enabled > Turn Off Auto play on > All Drives > Apply > এবার Ok করে বের হয়ে আসুন, আপনার কাজ শেষ । ভাল থাকুন এবং ভালবাসুন আমাদের এই দেশটিকে । আল্লাহ হাফেজ !!!